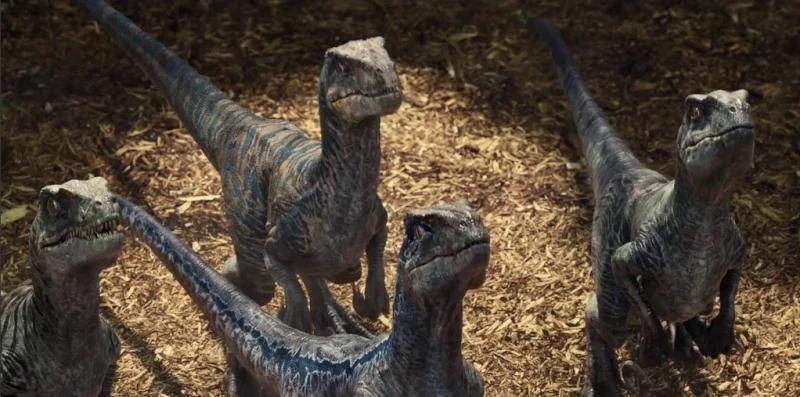
The Velociraptor - the name invokes thoughts of a terrifying hunter from the ancient past. This description of the long-dead animal is accurate. However, what the animal actually looks like in the average mind is often skewed. Most people imagine the large, human-sized, vicious reptile from Jurassic Park, as seen here:
However, this common depiction is rife with... let's say, creative liberties (The Jurassic Park raptors are based on a another, closely related dinosaur called Deinonychus). Since Jurassic Park was released, a mountain of evidence from both Velociraptor fossils and other dinosaurs has suggested that raptors were actually extremely bird-like, even covered in feathers. It is also important to note that real Velociraptors (as opposed to their Deinonychus cousins) were about turkey-sized, only six feet long, including their very long tail. They looked a little more like this:

In this post, I am going to detail how to draw one of these creatures with the most upmost accuracy we can derive from our current scientific understanding. (My raptor will be based on paleoartist Fred Wierum's reconstruction, as seen above)
As for materials, all you need is paper, a good pencil, and an eraser, and reference (I find that Fred Wierum's one picture is enough to get a good idea of the creature's anatomy).
1. Start with the outline ("construction lines")
2. Fill in the outline
After you have the base of the raptor down, it's time to start filling in the general shape of it (remember to refer to reference material to get everything right!). I suggest at this stage to not add any feathers yet. Draw the full neck, tail, and shape of the limbs around the lines. Remember to add curvature around important muscles like the calves and triceps (nothing too swole, but don't make the limbs flat). Also, add the outlines of the toes (with claws at the end) and fingers, at least the ones that will be visible out of the arm feathers, so the first two.
3. Erase the construction lines
Once you have the basic outline of the animal, erase all the unneeded lines to clean it up. Remember not to follow my guide exactly - if there's something you need to touch up, a joint or finger that is not quite right, fix it up! Erase and redraw. These pictures don't record the amount of minute changes i made to each part of the drawing. (Also, a minor error in this stage that I fixed later - the famous "sickle-claw" on the right foot is on the wrong side of the foot - an easy mistake to make with raptor dinosaurs)
4. Detailing the head
The head of the Velociraptor, like any dinosaur, has many details. You don't have to do them in any particular order, as long as they are in the right place, but with dinosaurs, I prefer to work from the back of the head and then down to the snout, then down to the mouth. The back of the head sports some downy feathers, with which the animal is mostly covered with. These feathers cover the head up until the are along the eye and the bottom of the jaw, from which then the rest of the face is covered in soft scales (this exact feather placement isn't backed by super-undeniable evidence, but is inferenced from fossils and feather placement on the faces of modern birds) (it also isn't seen in these pictures, but there are feathers along the top of the head in a similar fashion). Fill in only the pupil in the eye, the iris will be colored in later. Be sure to leave a small, discernible ridge along the brow. Add the nostril at the end of the snout, and small teeth in the jaw (make sure to have the same amount of teeth on both sides of each jaw so that it's symmetrical). Also be sure to add a tongue, which, as currently evidenced in some dinosaurs, is inflexible, which means it sits in the mouth, not moving when it roars, etc.
5. The Body
There isn't too much to say about the torso. Just add some minor feather detailing along the back, and have a small fringe of feathers down from the arms to the tail above the legs.
6. The Tail
The tail, unlike other parts of the raptor, isn't covered in downy feathers, but more bird-like, "fan" feathers. Draw the "feather fan" first without erasing the tail. Once you have that general shape and have erased the shape of the naked tail underneath, draw a layer of downy feathers on top of the fan, roughly along where the physical tail lies underneath, and continuing from the body feathers and the fringe above the legs. Then, draw the outlines of the fan-feathers as individual feathers. We'll color these and detail them better later.
7. The Legs And Feet
Downy feathers cover the legs and belly of the raptor as well, up until the heel. It is also important to remember that dinosaurs are digitigrades - they walk on their toes, not on their heels. The heel is right along the fringe of the feathers. Also, distinguish the claws from the rest of the foot. And, remember the dewclaw toe on the other side on the right foot next to the sickle-claw tow.
8. The "Wings"
Evidence from dromaeosaurids (the scientific name for dinosaurs considered "raptors") such as Dakotaraptor, Utahraptor, Achillobator, Microraptor, and Velociraptor itself have demonstrated that the arms of these dinosaurs were covered in wing-like feathers. Structures called "quill knobs" found from fossils of those three species are very similar to quill knobs found on the arms of modern birds. These function to more securely anchor the long, heavy feathers that are necessary for supporting flight. While raptors didn't have the physiology for the rest of their body for flight, it is thought that these large feathers evolved in raptors and the dinosaurs that would evolve into flying birds first for balance.
So, we are going to draw our raptor with very wing-like feathers. Like modern birds, wings for flight have different layers of different feathers, with the feathers getting larger and broader as the layers go down. We'll draw three layers - a downy one close to the arm, and two layers of increasingly broad feathers off that (something to remember is that these broader feathers are anchored on the second finger, then down along the arm to the elbow). Just like the raptor's whole body sketch, draw the basic lines and shape first, then the individual feathers. Also, don't forget to do the same with the other arm (i forgot to catch that in the pictures) - in the raptor I'm drawing, you only see the underside of that wing, so only the biggest feathers are visible. Also, don't forget to draw the raptors claws set in the fingers.
Here's the finished raptor sketch!
9. Coloring
I did not do a step-by-step record of the coloration of the raptor, but I feel I can explain it sufficiently. Of course, we have no idea how it was truly colored, so this is the stage where the most imagination can be employed. The Velociraptor lived in a desert environment, so colors such as white, grey, brown and beige make sense for a desert-dwelling animal, with reds, oranges and yellows also plausible. The blue around the face and arms I included because I made this one a male - male animals, especially birds, are more brightly colored so that they can attract mates. Counter-shading is also evident in my raptor. Counter-shading in animals is where the top half of the animal is more dark, while the underside is colored more lightly. This is to contribute to camouflaging, as the sun brightens the top of the animal and shadows darken the bottom. Therefore, with this coloring strategy, the colors of the animal are more even and blended in certain lighting conditions. I also colored the eye to be bird-like. It's calm and brown, with a circular iris, as opposed to the yellow, snake-like eyes of Jurassic Park raptors. It's also important to note how I distinguished each feather with the red colored pencil.
I'm amazed if you read this whole thing, even if you're Mr. Logsdon. I hope I went in-depth enough! (haha)
No comments:
Post a Comment
Note: Only a member of this blog may post a comment.